Ever notice that every animal is created with a smile.
Author: Lukeup
Stuck Solenoid
One of our solenoids got stuck and the zone stayed on. I disconnected it from the timer while the zone was on and tapped the wire turning the solenoid on and off. I could hear it clicking and turned the zone off. After reconnecting the solenoid to the timer the solenoid cycled correctly. These solenoids are normally closed if we loose power or if they fail, they should be normally closed. I’m not sure why this one stayed open. We will keep an eye on it and report back.
Bible Chapters
Richardson Residential Rental Registeration
I’m a against it. Has anyone in Texas heard of the 4th Amendment??
I couldn’t find the default login for the wrv54g vpn router so here it is.
username – admin
password – admin
This linksys wrv54g router requires username and password.
Most other linksys routers only require the password which is admin. NO username is required. Give these a try. If not, reset the router and they should work.
I had to read one slog till the end to find it. Most of the read was nothing about nothing.
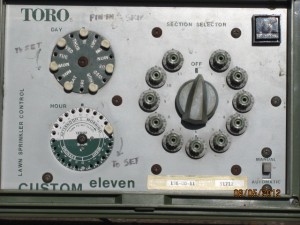
Searching the internet for a solution to a broken custom eleven was a joke. Here it is and you don’t have to email me to get it. This is a build your own solution. I’m using an SST-600i 6 zone by Rain Bird and 6 24 volt electric solenoid valves. Those of you familiar with the hydraulic controller know the valves buried (who knows where) operate when the controller releases the water pressure running from the water valve through the ¼” tubing to the ¼” drain tube. When the pressure releases, the zone valve opens to the zone’s sprinkler heads. When the pressure rebuilds (contol valve closes) the zone valve closes.
The Toro Custom Eleven sends the released water to the ¼” drain line. If your lawn professional doesn’t know that this is a closed system when they are working on and leave a hose off, you will have water running down your wall from the controller. Another story for another time. Get another lawn guy.
If the Toro Custom Eleven Hydraulic Controller is leaking you can use the following solution to fix the leaks and operate the sprinkler system manually. The new timer and electric solenoid valve solution will follow.
Manual Valve replacement for the Toro Custom Eleven Hydraulic 6 Zone Control system:
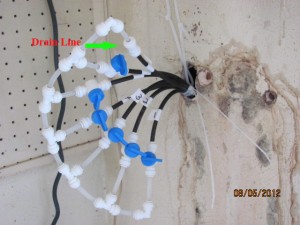
Turn off the water before removing your Custom Eleven. I used ¼” John Guest fittings to replace the controller – 6 cut off valves, 5 Tee’s, 2 elbow fittings, and 1 coupler. You can probably get by with making the connecting tubes 1 ½” to 2” long. You need 13 pieces of ¼” tubing. Here’s a picture of the masterpiece. All you need to do is open one valve and set your timer. When the timer goes off, close the valve and open the next. Let’s call it a Manually Hydraulic Human Control Timer.
When you cut the hydraulic tubes from the old controller be sure to mark them, especially the drain.
I installed the valves so the handle points to the black tube when it is opened. Makes it easier to explain to someone you need to operate it.
Toro Custom Eleven Hydraulic Sprinkler Controller Replacement
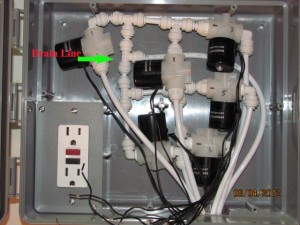
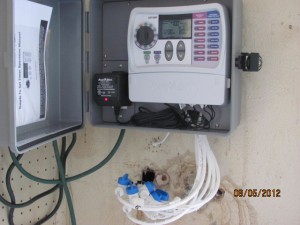
I used an SST-600i Rain Bird 6 zone controller with 6 – 24vac electric solenoid valves in an Orbit Sprinkler Timer Cabinet. This project is for a real do it yourselfer. If your not comfortable with electrical, please ask a handy man to hook this up for you. I had to connect an extension cord to the GFI receptacle because we did not have an outlet where the old controller was installed.
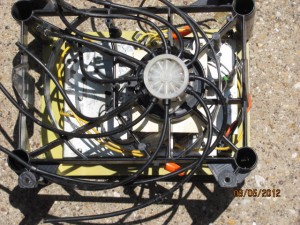
Connect the arrow side of the all the valves to the drain line. You can get fitting counts from the picture. Connect a tube to each valve inlet allowing 10 to 12 inches to extend from the box. Once you have the valves laid out and connected, place a mark on each side of the valves on the box. Drill holes big enough to fit a tie wrap through. Tie wrap the valves to the back of the box so they are secure when you hang it on the wall. Hang the box.
Connect the tubes from the zone valves to the tubes from your solenoid valves, you can turn on the water and check for leaks. Connect one wire from each valve to a piece of 20 gauge about 12” long using a crimp on lug or wire nut. That will be your common wire that you’ll hook to the controller. Mark the other wires per zone.
Install the timer per the timer and Orbit cabinet instructions.
Toro Custom Eleven Hydraulic Sprinkler Controller front
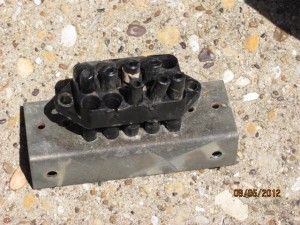
Toro Custom Eleven Hydraulic Sprinkler Controller back
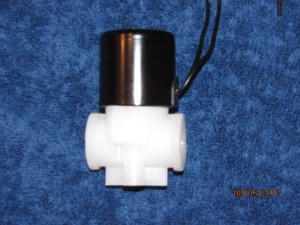
24 vac solenoid valve – $15.00 plus shipping
Currently out of stock
[si-contact-form form=’4′]
Fox News Ticker Test
Bottle Free Water Cooler Conversion Kits
Save Money – $100 dollars a Month
Convert your water cooler to a No-Bottle Water Cooler.
Bottleless or Bottle Free Water Cooler


The conversion kit contains the following stuff:
|
Solenoid Valve |
Water level switch |
|
On/off switch |
2 – 1/4″ to male pipe adapters |
|
1/4″ Union T |
1 – 1/4″ to male pipe elbow adapters |
|
1/4″ union coupling |
1/4″ valve |
|
10″ Black and white wires |
With connectors |
|
2′ of 1/4″ hose |
1/4″ union elbow |
|
Install Instructions |
Pictures |
To be sure this kit or which kit you need, please read the following.
First
To check if either of these kits will work for you, please determine if you have the rim with a funnel. The kit uses a 3†disc to hold the water inlet and water level switch.
Please study the following pictures.


If this kit will not work for you and you would like to convert your water cooler to a bottle free or a no-bottle water cooler, sometimes referred to as a Bottle Free Water cooler, I will help you with a solution. Please contact me using the contact page on my web site at lukeup.com and I will send you a link to forward me some pictures of your cooler. We will figure out a way to convert your cooler. No guarantees.
Also, if your water cooler does not have power, you can hook this kit up directly to a power cord and you’ll never have to refill a bottle again.
Second
If you can determine whether or not you need an extra switch, you can buy a kit that does not include an on/off switch. First unplug your water cooler and remove the back cover. Trace the black wire from the power cord to the on/off switch.

You need to be sure that you can find the wire that is on the heater or cooler side of the black wire. The black wire coming from the power cord may change into another color wire going to the switch. My cooler black wire was spliced to a red wire that went to the hot and cold switches.

If you can trace one of the other two wires to hook to, you do not need the kit that includes the switch. The arrow is pointing to the wires that can be used.
I have taken this conversion kit off because I cannot provide support any longer. There are too many different water coolers to cover with one kit. I will try to help you convert your cooler the best I can. All of the parts can be found on Amazon. I apologize for any inconvenience. Thanks.
Conversion Kit With a Switch – $58 + Shipping

Conversion Kit Without a Switch – $50 + Shipping

View Complete Installation Instructions
Please leave questions and comments below:
Patio covers made easy
ef77joqpcr
